

Contents
Install Parse Server To Use As Backend For Android Apps
 (2 votes, average: 5.00 out of 5)
Tung Dao Xuan, tungdx1210@gmail.com, is the author of this article and he contributes to RobustTechHouse Blog
Introduction
In this blog article I assumed you know what Parse Server is and that you are trying to learn how to install it to use as your backend for your Android mobile application.
The next section, I am going to show you how to install Parse Server in your local machine and write a small TodoList application using Parse SDK Android in just few minutes.
Installing Parse Server
Prerequisites
Node 4.3
MongDB version 2.6.X or 3.0.X
Python 2.x (For Windows users, 2.7.1 is the required version)
Installation
npm install -g parse-server
Running Parse Server locally
Step 1: Start MongoDB
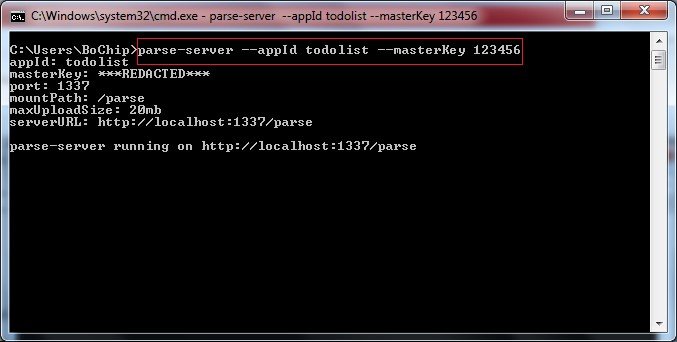
Step 2: Start ParseServer with your application info
parse-server --appId APPLICATION_ID --masterKey MASTER_KEY
For example as following figure
Writing TodoList application
To connect with Parse Server you can use Parse Android SDK, go here https://parse.com/docs/android/guide to learn more.
Step 1: Add dependencies
compile 'com.parse.bolts:bolts-android:1.+'
compile 'com.parse:parse-android:1.+'
Step 2: Add permissions in AndroidManifest.xml
<uses-permission android:name="android.permission.INTERNET" />
<uses-permission android:name="android.permission.ACCESS_NETWORK_STATE" />
Step 3: Connect Parse Android SDK with Parse Server
public class TodoApp extends Application {
    //TODO change your_host_ip
    private static final String HOST = "http://your_host_ip:1337/parse/";

    @Override
    public void onCreate() {
        super.onCreate();
        Parse.initialize(new Parse.Configuration.Builder(this)
                .applicationId("todolist")
                .clientKey(null)
                .server(HOST)
                .build());
    }
}
Note:
– Change your_host_ip to your Parse Server ip address
– Specify TodoApp.java class in AndroidManifest.xml
<application
    android:name=".TodoApp">
.
.
.

</application>
Step 4: Save a Todo
private void saveTodo(String todo) {
    ParseObject parseObject = new ParseObject("TodoList");
    parseObject.put("todo", todo);
    parseObject.saveInBackground();
}
Step 5: Get Todo list
ParseQuery<ParseObject> query = ParseQuery.getQuery("TodoList");
query.findInBackground(new FindCallback<ParseObject>() {
    @Override
    public void done(List<ParseObject> objects, ParseException e) {
        if (e == null) {
            displayData(objects);
        } else {
            //handle the error
        }
    }
});
That’s it. It is pretty simple to use Parse Server as your backend. You do not need know coding for your backend while still having a backend for your mobile application. Isn’t that cool or what!
Source code
https://github.com/tungdx/TodoList
Brought to you by the RobustTechHouse team (Singapore based app development company). If you like our articles, please also check out our Facebook page.